

May 20, 2024
Using Vitest with GitHub CoPilot for React Components
Introduction
React has as one of its strengths good coupling with a test framework and test library that make it easy to build and maintain unit tests. For many years, Jest was the framework of choice. However, with the introduction of Vite and its companion test runner Vitest, there is a better way.
Unit testing is an important practice that helps ensure both working code over time, as new capabilities are introduced to the project as well as when refactoring code. Unfortunately, too often building unit tests is viewed as cumbersome: there is a fair amount of boilerplate, there is the need to determine the function mocking framework for anything complex, and there is the need to understand how to query the React document in a way that doesn’t produce test brittleness. Well, generative AI to the rescue! Using GitHub Copilot can significantly reduce the burden of writing tests. Unfortunately, it’s not for free but still worth the trouble. This post will walk you through how to use React, Vitest, and Copilot together, and discuss some of the common pitfalls in using them together to write great unit tests. We cover some prompts that help get better results.
If you’re interested in some general resources on testing in React, I suggest you consult some of my colleague Chris Riesbeck’s pages and links on his resources website. If you are already testing like Watts Humphrey, dig in here
Setting up the Development Environment
If you already have a project set up with Vitest and React, you can move on to the section discussing configuring VSCode. For those starting from scratch, follow these steps:
Installing Node.js and VSCode
Before you can start working with Vitest and React, you’ll need to have Node.js and Visual Studio Code installed on your machine. Node.js is a JavaScript runtime that allows you to run JavaScript outside of a web browser, while Visual Studio Code is a popular code editor with excellent support for React and other web development technologies.
- Download and install the latest version of Node.js from the official website: https://nodejs.org/
- Download and install Visual Studio Code from the official website: https://code.visualstudio.com/
Configuring a Project to Use Vitest
To set up a new React project with Vitest, you can follow the official [Vitest documentation] (https://vitest.dev/guide/)
The documentation provides step-by-step instructions for installing and configuring Vitest in your project, as well as setting up testing environments for various frameworks, including React. tests in vitest or jest.
If you’re using TypeScript in your project, you’ll also need to install the necessary TypeScript dependencies and configure Vitest to work with TypeScript. Follow the instructions in the Vitest documentation for setting up TypeScript support.
An alternative to setting up a project from scratch is to use a starter project that has React, TypeScript, Vitest, and tools like ESLint and Prettier configured. I built a starter project with all of these for CS394.
Configuring VSCode for GitHub Copilot and Vitest
To get started with GitHub Copilot and Vitest in Visual Studio Code, you’ll need to install the necessary extensions and sign up for a GitHub Copilot subscription.
Installing GitHub Copilot
If you’re a student with an .edu email address, you can sign up for GitHub Copilot for free through the GitHub Student Developer Pack. If you’re not a student, you can choose a plan and sign up at https://github.com/features/copilot/plans.
Once you’ve signed up for Copilot, you’ll need to install the Copilot extension in Visual Studio Code. Follow the installation instructions in the GitHub Copilot documentation.
Installing the Vitest Extension
To make it easier to run and debug tests in Visual Studio Code, the official Vitest extension from the Visual Studio Marketplace is a real productivity booster from the Visual Studio Marketplace. You can find it by searching for “Vitest” in the Extensions view or by following this link: Vitest - Visual Studio Marketplace.
The Vitest extension provides a dedicated Test Explorer panel in Visual Studio Code, allowing you to easily run individual tests, test files, or the entire test suite. It also integrates with the debugger, making it easier to debug your tests and React components.
With both GitHub Copilot and the Vitest extension installed, you’ll have a powerful setup for writing and maintaining tests for your React components using the latest tools and AI-assisted coding capabilities.
Writing Tests with Vitest
For a detailed explanation of writing tests with Vitest for React components, including topics like the basic test structure, rendering components, simulating user interactions, testing state changes, and testing lifecycle methods, I recommend consulting Professor Chris Riesbeck’s excellent slides on testing and React.
In addition to the information provided in those slides, there are a couple of additional steps that make developing tests easier with Vitest and React:
- Install Jest Matchers: To make use of the convenient Jest assertions in your tests, you’ll need to install the
@testing-library/jest-dompackage:
npm install --save-dev @testing-library/jest-dom- Install React Testing Library: The React Testing Library is a popular library that provides utilities for testing React components. You can install it with the following command:
npm install --save-dev @testing-library/reactWith the React Testing Library installed, you’ll have access to various utilities for rendering components, simulating user interactions, and making assertions in your tests.
CoPilot answers tend to assume your tests have access to both of these libraries so adding them first helps.
Using CoPilot with Vitest and a React component
Open up your project with vscode. Here is a screenshot of my vscode setup; with a react component in typescript open:
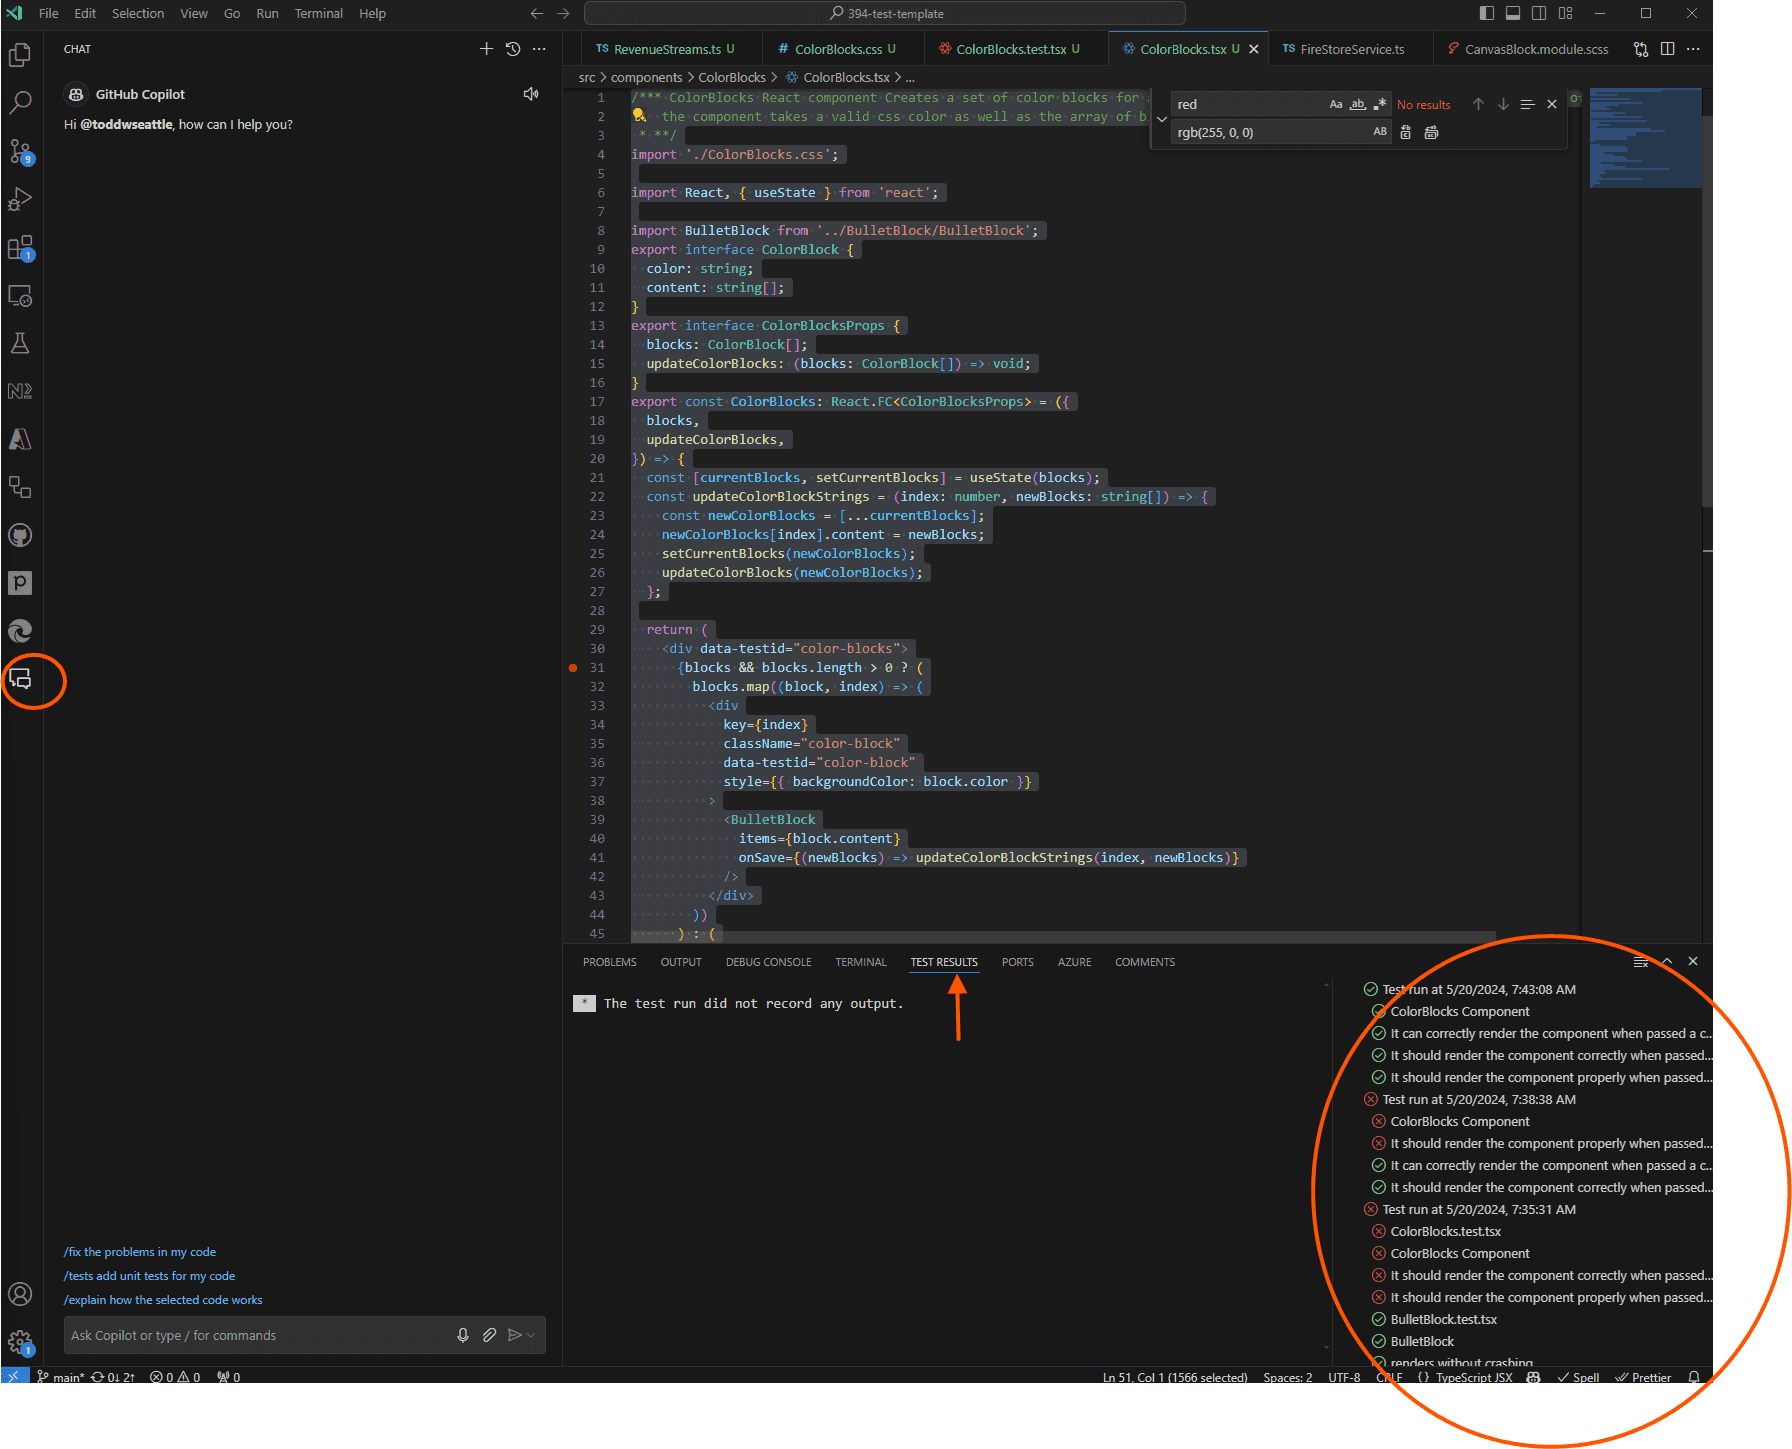
The icon circled on the left activates the GitHub CoPilot Pane, which is open on the left. CoPilot can also be activated in-situ with default keys `Ctrl+K I” and a chat can also begin.
The panel circled on the lower right shows test results from the vitest extension. Note the “Test Results” pane is suggested which shows the result of the latest test run.
Generating tests
Tests can be generated by selecting the component, and then in the copilot chat entering /tests and it will generate a default set of tests. This works ok; but I’ve found the process works better if it is done through a series of prompts. Problems I have found with generating all the tests in one shot:
- CoPilot has a tendency to co-mingle Jest and another test framework Chai matchers; and sometimes the matchers are just wrong. I had a case where in generated the matcher
.toBeInDocumentinstead of the jest matcher.toBeInTheDocument. - sometimes it generates cases for things that aren’t covered. For example, for a component that had an edit button, it thoughtfully generated a test to insure that in the component alone the bullet items changed; though the design was to fire an event to send the edits up in the component hierarchy to be passed down again to the component.
- there can be a cascade of errors that are harder to fix in bulk with the big output. Starting small insures that any mistakes can be fixed first.
Prompts for Generating Tests
The approach that worked best for me is to really go through the process of getting a first simple test running, and then suggesting the tests that make sense. It may still be useful to dialog with the CoPilot to get the number of cases.
Example Component
The prompts I use were for the following example component ColorBlock. ColorBlock renders a series of colored rectangles with a set of bullets within the block. The bullets are rendered using a component called BulletBlock that takes an array of strings and an onSave handler function that receives any changes to the bullets.
/*** ColorBlocks React component Creates a set of color blocks for an array of blocks, where each block contains an array of strings
 *  the component takes a valid css color as well as the array of blocks
 * **/
import './ColorBlocks.css';

import React, { useState } from 'react';

import BulletBlock from '../BulletBlock/BulletBlock';
export interface ColorBlock {
  color: string;
  content: string[];
}
export interface ColorBlocksProps {
  blocks: ColorBlock[];
  updateColorBlocks: (blocks: ColorBlock[]) => void;
}
export const ColorBlocks: React.FC<ColorBlocksProps> = ({
  blocks,
  updateColorBlocks,
}) => {
  const [currentBlocks, setCurrentBlocks] = useState(blocks);
  const updateColorBlockStrings = (index: number, newBlocks: string[]) => {
    const newColorBlocks = [...currentBlocks];
    newColorBlocks[index].content = newBlocks;
    setCurrentBlocks(newColorBlocks);
    updateColorBlocks(newColorBlocks);
  };

  return (
    <div data-testid="color-blocks">
      {blocks && blocks.length > 0 ? (
        blocks.map((block, index) => (
          <div
            key={index}
            className="color-block"
            data-testid="color-block"
            style={{ backgroundColor: block.color }}
          >
            <BulletBlock
              items={block.content}
              onSave={(newBlocks) => updateColorBlockStrings(index, newBlocks)}
            />
          </div>
        ))
      ) : (
        <div>No blocks to display, add a block</div>
      )}
    </div>
  );
};
Get a first test running that the component loads validly
First, let copilot know what test framework and libraries you are using. It may still hallucinate with other libraries! but it improves the odds:
Help me write some /test in vitest and @react/testing-library for a the react component selected. The tests should not use jest matchers; only matchers available in vitest.then add
First, create a basic test that shows the component can render correctly when passed a color but an empty array of colorblocksThis should create a basic test that’s usable that renders the component.
In your test file (in this example ColorBlock.test.tsx) be sure to include the jest matchers and the react testing library. The test will likely use render from the react test library. Also include some of the basic test functions from vite:
import '@testing-library/jest-dom';

import { render } from '@testing-library/react';
import { describe, expect, test, vi } from 'vitest';
Get this first test passing before you add more tests.
Define your test cases
As Kent Beck describes in the cannon TDD, create a list of tests you would want to do. For example, for the ColorBlock component, i used this prompt:
Here are some additional Tests to add:
    - It should render the component correctly when passed a single colorblock, with a single string
    - It should render the component properly when passed a single colorblock with multiple strings
    - It should render the component properly when passed multiple color blocks that contain multiple strings
    - It should properly call the updateColorBlocks callback if the bullet points are entered
Wrap these and the existing test in a describe block
when it generated the first test for me, it did not wrap it in a describe block, which helps create a test suite; and also permits the use of helpers like beforeEach for generating the data.
Debug the additional tests, and continue until you are satisfied!
Here’s what that result looks like for the component presented at the beginning after this copilot dialog and a little debugging:
test('It should render the component correctly when no blocks are passed', () => {
  const { getByTestId, queryByText } = render(
    <ColorBlocks blocks={[]} updateColorBlocks={mockUpdateColorBlocks} />,
  );
  const colorBlocksElement = getByTestId('color-blocks');
  expect(colorBlocksElement).toBeInTheDocument();
  expect(queryByText('No blocks to display, add a block')).toBeInTheDocument();
});

test('It should render the component correctly when a single block with a single string is passed', () => {
  const colorBlocks: ColorBlock[] = [
    {
      color: 'rgb(255, 0, 0)',
      content: ['string1'],
    },
  ];

  const { getByTestId, getByText } = render(
    <ColorBlocks blocks={colorBlocks} updateColorBlocks={mockUpdateColorBlocks} />,
  );
  const colorBlockElement = getByTestId('color-block');
  expect(colorBlockElement).toBeInTheDocument();
  expect(colorBlockElement).toHaveStyle('background-color: rgb(255, 0, 0)');
  expect(getByText('string1')).toBeInTheDocument();
});

test('It should render the component correctly when a single block with multiple strings is passed', () => {
  const colorBlocks: ColorBlock[] = [
    {
      color: 'rgb(255, 0, 0)',
      content: ['string1', 'string2'],
    },
  ];

  const { getAllByTestId, getByText } = render(
    <ColorBlocks blocks={colorBlocks} updateColorBlocks={mockUpdateColorBlocks} />,
  );
  const colorBlockElements = getAllByTestId('color-block');
  colorBlockElements.forEach((colorBlockElement) => {
    expect(colorBlockElement).toBeInTheDocument();
    expect(colorBlockElement).toHaveStyle('background-color: rgb(255, 0, 0)');
  });
  expect(getByText('string1')).toBeInTheDocument();
  expect(getByText('string2')).toBeInTheDocument();
});

test('It should render the component correctly when multiple blocks are passed', () => {
  const colorBlocks: ColorBlock[] = [
    {
      color: 'rgb(255, 0, 0)',
      content: ['string1'],
    },
    {
      color: 'rgb(0, 255, 0)',
      content: ['string2'],
    },
  ];

  const { getAllByTestId, getByText } = render(
    <ColorBlocks blocks={colorBlocks} updateColorBlocks={mockUpdateColorBlocks} />,
  );
  const colorBlockElements = getAllByTestId('color-block');
  expect(colorBlockElements.length).toBe(2);
  expect(getByText('string1')).toBeInTheDocument();
  expect(getByText('string2')).toBeInTheDocument();
});

test('It should call the updateColorBlocks function when the onSave function of the BulletBlock component is triggered', () => {
  const colorBlocks: ColorBlock[] = [
    {
      color: 'rgb(255, 0, 0)',
      content: ['string1'],
    },
  ];

  const { getByTestId } = render(
    <ColorBlocks blocks={colorBlocks} updateColorBlocks={mockUpdateColorBlocks} />,
  );
  const bulletBlockElement = getByTestId('bullet-block');
  fireEvent.click(bulletBlockElement);
  expect(mockUpdateColorBlocks).toHaveBeenCalled();
});
Pitfalls tips and tricks.
Here are some things that I have seen CoPilot do that make the tests not work:
-
it will assume things that aren’t in the code. For example, when i first generated the tests, it assumed i had created a
data-testidattribute to different parts of the component. Note in the source code toColorBlock, thedata-testid’s for for the outer test component, and the div’s for each individual color block div in the map. -
It sometimes uses Jest or other test library functions that aren’t appropriate for vite. The repeated example I found was creating mocks with
jest.fn()instead of its vite equivalentvi.fn(). -
On style testing for colors, it didn’t really understand what the test library would return. so for example for the css
color: redthe react test library returnscolor: rgb(255,0,0)so using the rgb values instead of the color names is a better choice for the tests. -
As I mentioned earlier; sometimes it will make up a matcher that doesn’t exist.
In most cases, you can give copilot the error, and your best guess as to why it didn’t work and it will come up with a correction. Remember, It’s still necessary to debug and examine the tests as you go. Sometimes what you think is a bug in the copilot generated test is really a bug in your code!
Happy Testing!